Tag: Lytech CL2005 Service Manual, Lytech LED display control system manual, Lytech after-sales service, Lytech

VERYPIXEL is specialized in LED display R& D, production and manufacturing companies, we are committed to providing customers with a variety of ☞ LED Display Solutions ☜ , and to provide you with quality products pre-sales, after-sales service.
1. The system technical diagram
(connection diagram of computer and controlling system, computer and LED screen)

2. Computer selection and installation steps
Operating system: CL2005 system need the support of Microsoft Office 2000 or Microsoft OfficeXP. Recommend running in the environment of WindowsXP or OfficeXP.
Hardware configuration: Pentium 300MHZ or above Memory: 64M Graphics Card: more than the standard display mode VGA256.
2.1 Installation
Run CL2005Setup.exe program on the computer,then the following screen appears on the screen:
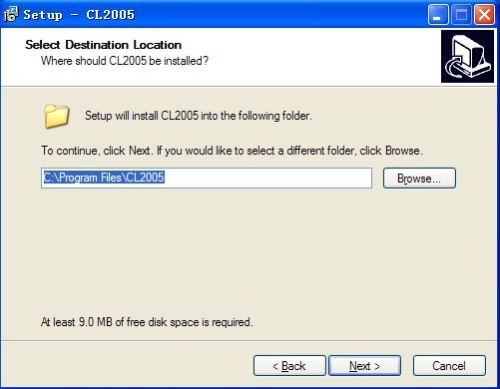
Click <Start>, then the CL2005 screen management system communications will be installed on the computer.
2.2 Operating
In the [Start] menu, select [Program] -> [CL2005-screen management system Communications] -> [CL2005] to start the CL2005 screen management system communications.
3. Setting Computer parameters
3.1 Communication settings:
In the CL2005's main menu, click [Settings] -> [Communications], the Communications Setup window will appear. For “Mode” option, select the serial communications, Ethernet or modem. Under normal circumstances use the serial communication mode. RS422 or RS485 serial networking model is also classified into the serial communications.
3.2 Display size settings:
If serial communication mode has been selected, the computer has been connected with the control card and the control card has been powered up, you can use the function <automatically find> to determine the serial communication port which connects the computer and display, to determine communication rate, and also display parameters.
4. Simple software operation steps
In the file selection area, Select the drive, folder, and then double –click the filename in the file-name list to upload, the selected filenames will appear in the “Pictures send to LED” and “ Program Schedule”.
"Send to display the picture,"There are five buttons below the “Picture send to LED”, respectively,<Edit>,< Del>,<As Tmr BkGnd>, <Input text>,<Play at once>.
[Deleted]: Select a picture or files of other type, click <Del> button, then you can remove the file from the “Pictures send to the control card”, while this operation doesn’t actually delete the files stored on your computer.
[Edit]: Select a picture or files of other type and click <Edit> button to automatically start the related editor program ,edit the file.
[As Tmr BkGnd]: If the selected file is a picture file, this file can be used as the background to display data like time, security days, temperature, and humidity etc. Users can arrange the display positions of the above items by clicking the command “Design Timer” in the Tools submenu (Refer to Chapter VI).This feature is particularly suitable for the occasions required to show the date, time, temperature, humidity, or security days with big figures.
[Input Text]: Input the text directly by keyboard entry or copy and paste.
[Play at once]: When click <Play at once> button, the content in the edit window can be immediately sent to the display, and after playing this content, the display will come back and continue to play the original program.
5. Basic Trouble shooting
● Interrupted [replacement scan] process
The control card power or CL2005 program is turned off accidentally during replacement scanning, causing the interruption of replacement process and failure to find the control card.
Solution: In the [Settings] menu, choose the right communication port, as well as card type, and then the main menu [Tools] -> [Controller Settings] -> [password] -> [Find] -> [Cancel] -> [ Last CPLD programming failed] -> [OK].
● Failed communication initialization
Solution: Check whether there are other programs using the selected communication port of this program or not. If necessary, please restart the computer and then firstly run CL2005 to send the data.
● Pause in the final scene of continuous left movement text
The entering mode of the first scene and that of the last scene is not consistent, for stay time exists or user does not select the option “close to the previous scene”.
Solution: Set the fist scene and the last scene to be the same mobile effect, or add a blank screen to the final scene and set the mobile effect of blank screen to be the same as the final scene.
6. Special features
Rf Control

Remote control has a lot of functions. It can be used to select at most 10 screen frames among 90 screen frames and play them continuously, to adjust playing rate and brightness of LED display. Note that before using the multiple choices, users should upload the character dot-matrix library with CL2005 software.
Remote operation requires the remote control receiver to work together. The CPU chip on the remote control receiver is to translate the keys of remote control to some communication commands of CL2005, and then send the commands to the CL2005 control card by the serial port.
Operation of multi-choice remote control is as follows
1. Brightness adjustment
Each time you press the key <call>, the screen brightness will increase by a level. When the level increases to 8 and you repress the key <call>, the brightness will return to level 1, cyclic change like this.
2. Screen show selection
A. Press the key <Exit> to enter the process of screen show selection. In the process of selection, press the key <Exit> is to cancel all the made choices and to come back to play the originally selected content.
B. When enter the process of screen show selection,“Figure xx” is to appear on the display screen to indicate the sequence No. of the current image, and you can press the number key to choose other images at this time.
C. If the screen images indicated by number key input are effectual, the display is to load these images, at this time you can press the key <ADD> to change entering speed of the screen image circularly.
D. After loading the screen image, if it is determined to be put in the new play sequence, you can press the key <*>,at this time the display screen still display the image just selected while the prompt text is “Figure—” which is waiting for your new input.
E. If the input number exceeds the number of effectual screen images, the prompt text on the display screen is also to become “Figure—”.
F. After selecting the picture, press [#] key to save the number, the display will start playing the new sequence.
Page address:
http://www.verypixel.com/service/Lytech_CL2005_Service_Manual.html