Tag: LINSN Brief Manual, LED Control System Commissioning

VERYPIXEL is specialized in LED display R& D, production and manufacturing companies, we are committed to providing customers with a variety of ☞ LED Display Solutions ☜ , and to provide you with quality products pre-sales, after-sales service.

1. LINSN System Connection
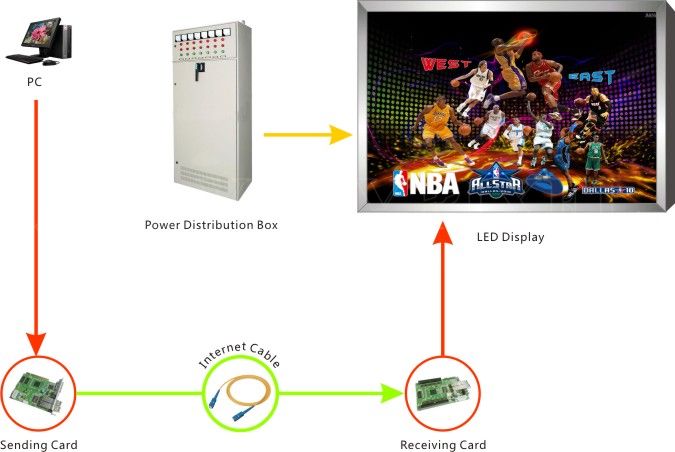
2. Computer Selection and Installation
2.1 Operating Environment
Operating system:
Chinese/English Windows98/me/2000/NT/XP
Hardware Configuration:
CPU:Pentium 300MHz or above ROM:64M above Graphics Card: Standard VGA 256mode or above
Related Software:
Microsoft Media player compulsory
OFFICE2003—in case of *. Doc files
RealPlayer—in case of RealPlayer files
2.2 installation
“LED Studio” can be easily installed, as shown below: Put the “LED Studio” installation CD into the CD-ROM, The Installation Menu will automatically pop up. (if not, then select this CD-ROM, double click it with your mouse)
Then select “Install LED Studio” to start the Installation Guide, as Shown in Figure 2-1.
After that, simply follow the instruction on the screen. Note: this software is protected by a serial number. Please enter the correct serial number in order to process the installation. Please ask the products provider for the correct serial number.
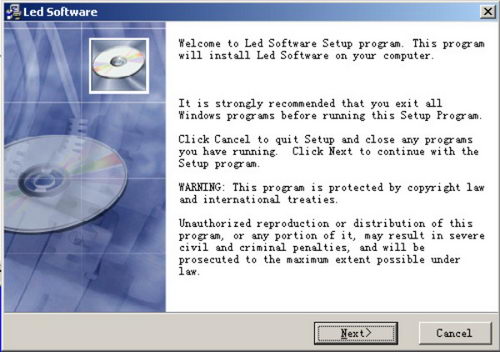
Figure 2-1
After “LED Studio” software has been successfully installed, there will be a “LED Software” program group in the 【Start】/【Program】,then move to the “LED Software” under this program group, click to start.
3. Software Setup
3.1 Open software setup
Click on “option”in the menu, and select “software setup”. A administrator password dialog box will appear, type in the password and choose “ok” to open the “software setup” dialog box.
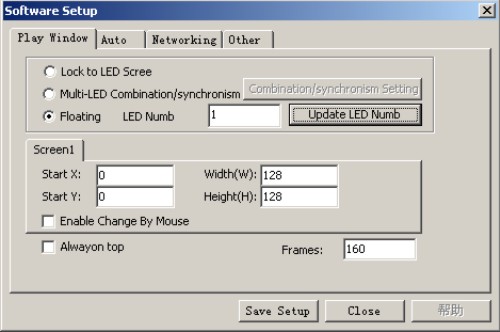
Figure 3-1
3.2 Play window
lock to LED screen, multi-LED screen combination/synchronism, floating.
Lock to LED Display
Lock play window to Led area.
Multi-display combination/synchronism
Select multi-display combination/synchronism, and click “combination/synchronism setup” to open multi-display combination/synchronism setup dialog box, Screen combination/synchronism.
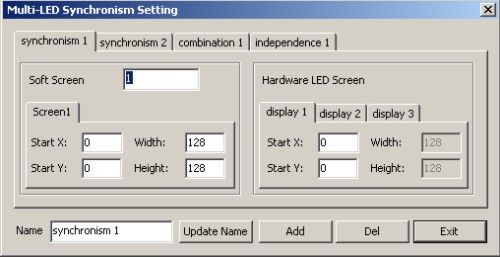
Figure 3-2
Random setup
User can setup the display number and adjust the size and position of every display at random; when Led display number changes, click “update display number” to update it.
Enable change by mouse
Allow the change of play window size by mouse.
Always on top
Play window will always on top of any other windows.
Software play frame frequency
Adjusting the value can improve the play effect according to different computer configuration.
3.3 Auto Setup
As shown in figure 3-3, the software has following functions:
Start when Windows starts up.
Load file when starting.
Play document when starts up automatically.
Play document when starts up manually.
Change virtual/real automatically.
Mouse hide when software is playing.
Auto update new version software.
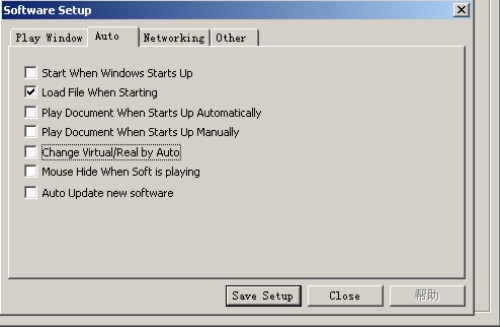
Figure 3-3
3.4 Other setup
As shown in figure 3-4,
Auto restart when error: restart the software automatically when error occurs.
Restart every day: restart at a certain time everyday.
Auto Backup: backup program at certain time.
Record play time: record the play file time, then save it to Play.txt under the install catalog.
Unable message when error: No dialog box appears when error.
Prompt when quit: whether appearing dialog box when existing this software every time.
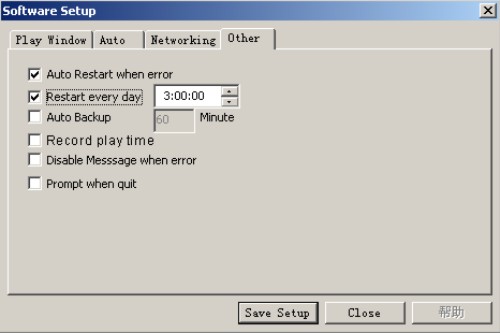
Figure 3-4
4. Operation
4.1 Cartoons display
4.1.1 Create a new cartoon window:
Click on the “New window” button select “File Window” in Figure 4-1 to create a new file window, as shown in Figure 4-2.
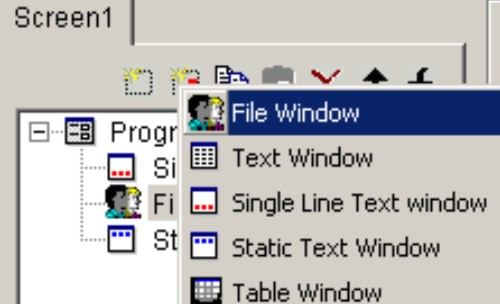
Figure 4-1
4.1.2 Setup Cartoons window
As shown in Figure 4-2, the upper part is for setting up program properties.
Name: program name.
Frame: you can setup the width and color of the frame.
Starting point X: x-coordinate of the starting point.
Starting point Y: y-coordinate of the starting point.
Width: setup the width of this program.
Height: setup the height of this program.
Lock: lock this program window to prevent it from moving.
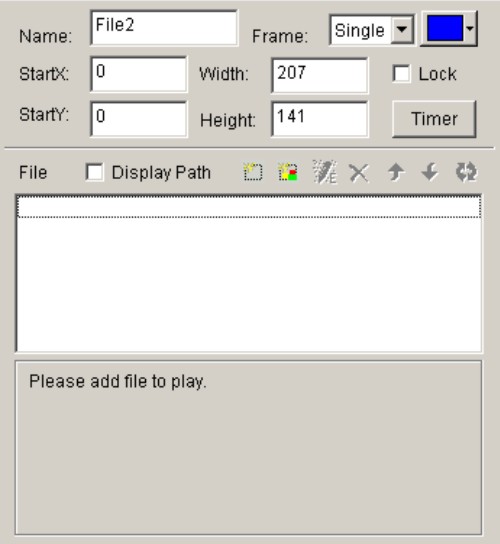
Figure 4-2
4.1.3 Open playing files.
Click on the “add file” button in the lower part (Figure 4-2) to open file dialog box. (as shown in Figure 4-3)
This studio can play all cartoons files and all media files (AVI/MPEG/ASF/WMV), FLASH files (SWF), REALPLAYER files (RM), etc. Select any file of the above formats, and then click on “open” to open it. Now the bottom-right of the main window will change to looks like Figure 4-4.
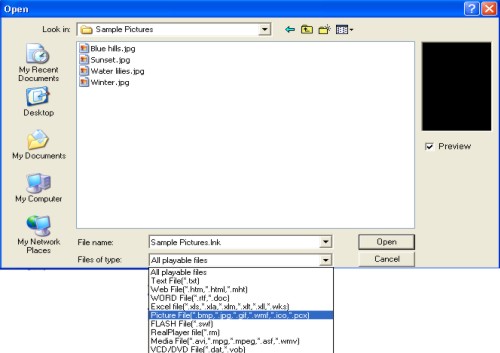
Figure 4-3
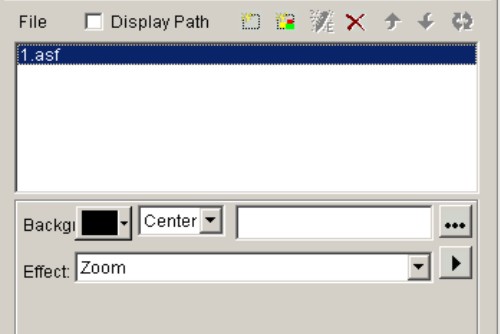
Figure 4-4
4.1.4 Setup Cartoons file properties
The opened file has been added to the list, now there will be options of this file appear below. (Figure 4-5), you can select background color, background picture, background picture drawing method, and three effects are optional.
4.2 Picture display
4.2.1 Create a new picture window
Click on the “New window”button and select “File Window” in the menu (as shown in Figure 4-5), to create a new file window, as shown in 4-6.
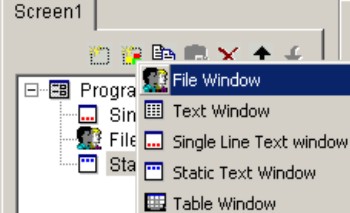
Figure 4-5
4.2.2 Setup picture window
As shown in Figure 4-6, the upper part is for setting up program properties.
Name: program name.
Frame: you can setup the width and color of the frame.
Starting point X: x-coordinate of the starting point.
Starting point Y: y-coordinate of the starting point.
Width: setup the width of this program.
Height: setup the height of this program.
Lock: lock this program window to prevent it from moving.
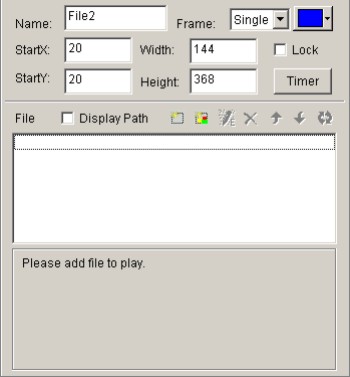
Figure 4-6
4.2.3 Open playing files
Click on the “add file” button to open the file dialog box (as shown in Figure 4-6), select the picture format from the list. Then select the file that you want to open in the box above. (Once you select a picture, you can preview it in the right-hand-side frame.) Click on “open” to open the selected file, now the bottom-right corner of the main window will change, as shown in Figure 4-7.
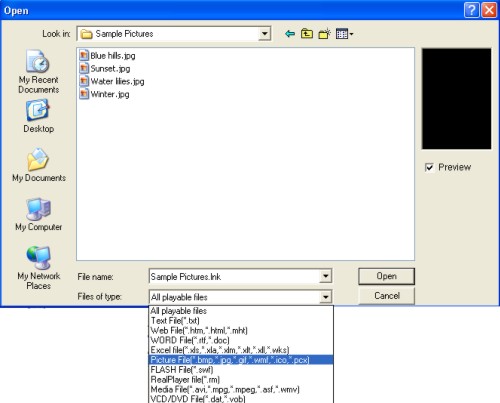
Figure 4-7
4.2.4 Setup picture properties
The opened file has been added to the list. Now, options of this file will be listed below. you can select background color, background picture, background picture drawing method, plenty actions, four effects, speed, staying time, clearing effects, clearing speed.
4.2.5 Insert background picture, appearing music and texts
Insert background picture
Click on the button select and open the picture you want to insert in the “open file” dialog box. Also you may directly key in the address of the background picture in the edit frame.
Insert clearing music
Click on the button and select the music file that you want in the “open file” dialog box, then click “open”.
4.3 Character display
4.3.1 play in a document window
This window is not compulsory. Words can be displayed in a picture and document window, this window is only a quick way to key in simple words like company name, greeting caption, or notes.
Creat new text window
Click on the “new window” button Then select “Text window” in the menu to create a new text window.
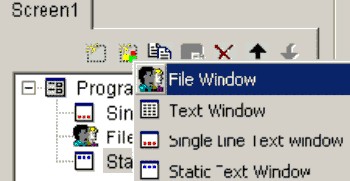
Figure 4-8
Setup Text window
Name: program name.
Frame: you can setup the width and color of the frame.
Starting point X: x-coordinate of the starting point.
Starting point Y: y-coordinate of the starting point.
Width: setup the width of this program.
Height: setup the height of this program.
Lock: lock this program, and prevent it from moving.
Background: setup the background color of this program.
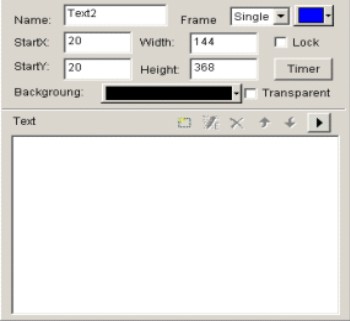
Figure 4-9
Insert and edit text
editing texts. After clicking on the “add text” button a “Text Edit” dialog box will appear as shown in the Figure below. In the edit box at the bottom, you can key in or paste text. Also you can do type-editing, you can setup options like: Background, Font, Action, Speed, Staying time, etc.
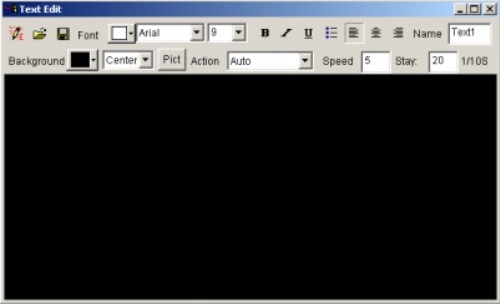
Figure 4-10
Close the “Text Edit” dialog box after finishing editing. Now the Text will appear in the list.

Figure 4-11
If you want to make any changes to your texts, just simply select them and then click on the button An edit box will appear and let you edit the texts. To delete the texts, you can use the button To change the playing order, use buttons and or you can preview the selected texts by clicking on the button
4.3.2 Play in a single line text window
This window is only for single line sliding captions, such as greeting captions, notes, etc. These texts support transparent display, which can be added on any windows, including video files playing in video windows or in pictures and texts windows.
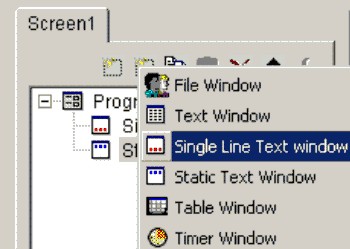
Figure 4-12
Create a new Single Line Text window
Click on the “new window” button and then select “Single Line Text window” in the menu to create a new single line text window.
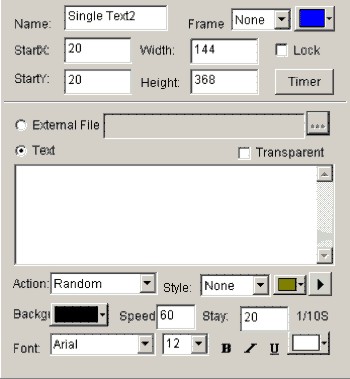
Figure 4-12
Setup Single Line Text window
set up program properties.There are two ways to input texts, one is open from external documents, and another is directly input to the edit box.
Open from external documents
Select “External file”, then click on button to open files. Edited text files can be dynamically displayed when the program is playing. you can setup Action, Background, and Font.
Input in the edit box
Select the “Text”, and then type in texts that you want in the box below , you can also setup the Action, Background and Font.
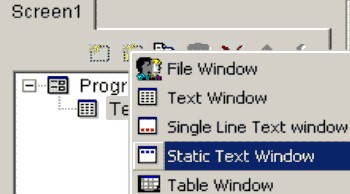
Figure 4-13
4.3.3 Play in the Static Text Window
This setup window is for playing static texts:
Setup the static text window
The upper part is for program properties’ setting. Type in the texts you want in the edit box, and choose their properties below, like: transparency, Align, Background, and Font, etc.
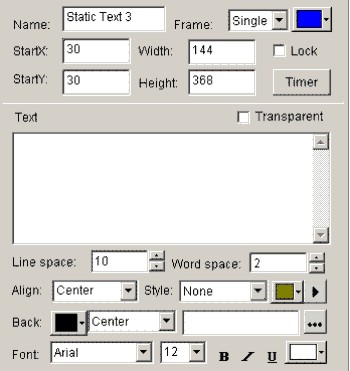
Figure 4-14
4.3.4 Play text files in a File Window
Create a new File window
Click on the “New Window” button select “File Window” in the menu to create a new “File Window”
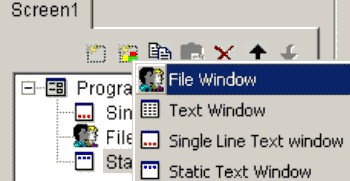
Figure 4-15
Setup File Window
Name: program name.
Frame: you can setup the width and color of the frame.
Starting point X: x-coordinate of the starting point.
Starting point Y: y-coordinate of the starting point.
Width: setup the width of this program.
Height: setup the height of this program.
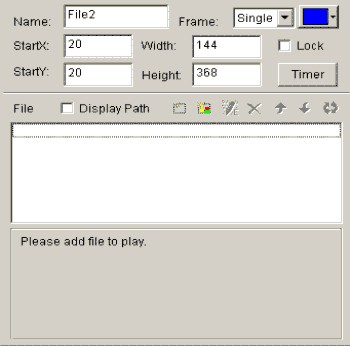
Figure 4-16
Open files
Click on the “add file” button an open file dialog box will appear. All supported format has been shown in the list at the bottom of the dialog box. Select WORD File, choose the file you want to open in the box above, then click on “open” to open it.
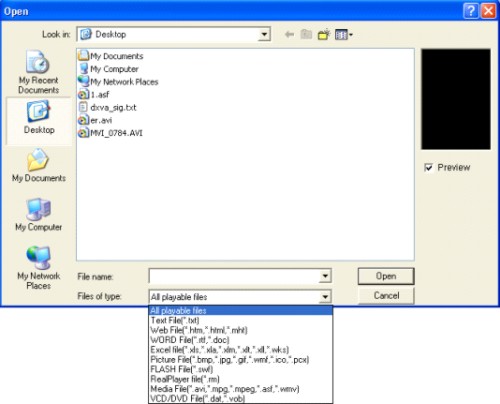
Figure 4-17
The opened file has been added to the list, now the options of this file will be listed below. Options can let you setup the background (includes color, pictures, drawing method), Font, Plenty Actions, four available effects, Line, Speed, Staying time, Font, etc. (Note: If there are only a few words, file window may be used. If the type-editing is complicated, WORD file may worth to be considered. )
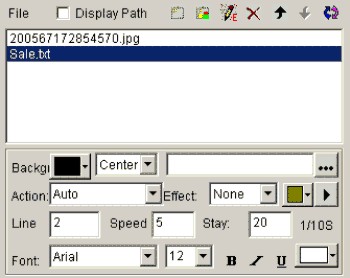
Figure 4-18
5. Frequently asked questions
A. Warning: MCI systematic error when starts up?
This is because that Windows Media Player has not been installed, please install it. Find a file named: Mpsetup2K.exe (for Win2K/XP/ME) or Mpsetup98. exe (forwin98) in your CD-Rom. Double clicks to install.
B. Warning: cannot find LED screen system or transmission error?
This is due to the disconnection between the Serial Pot cable and the LED, or they are not well connected. Please check the cable.
C. How to change the position and size of the play window?
To change the position and size of the window, you must go to software setup. Set the position of play window to “Any position”, then enter coordinates and screen size. You may also use mouse to drag and change the position and size of the play window. For details, please refer to “Software Setup”.
D. How to run and play certain files?
Firstly, you should go to “Software Setup”, and select all three options under auto -setup.
E. How to edit the existing files (. lsd)?
Click on “Open” button to open the file, and then select “allow edit” to allow you make changes to the files. For details, please refer to “Programming”.
6. Special function
Program (Program document) consists of one or more than one program pages. There are two kinds of program page: normal program page and overall program page. Normal program pages are the main components of a program, so there may be many, they will be played in order, one after another; there should be only one overall program page, played throughout the playing process. It is mainly used for fixed contents’ broadcast, such as clock, company logo, etc.
Program page consists of one or more windows, which is used to show the contents that users want to play, like documents, pictures, cartoons, multimedia segments etc. There are twelve kinds of program windows: file window, text window, single line text window, static text window, table window, timer window, data base window, DVD/VCD window, external software window, date/time window, video line-in window, and geometrical graph window.
File window: can play various files like words, pictures, cartoons, tables, etc.
Text window: Used for quick inputs of short writings, such as notifies, etc.
Single line text window: to play single line text window, such as notices, adverts etc. writings.
Static text window: to play static texts, like company names, titles, etc.
Table Window: to edit and play table figures.
Timer window: for timing, supporting clockwise and anti-clockwise.
Database Window: To play ACCESS Database and ODBC Driver Database
DVD/VCD window: to play DVD/VCD
External program window: To insert external program into the play window, mainly used for small programs made by users.
Date/Time window: to display date and time
Video line-in window: to play signals from TV cards, Video Collecting Cards, etc.
Geometric graph window: to display geometric graphs like straight lines, circles.

Page address: http://www.verypixel.com/service/LINSN_Brief_Manual.html